Custom field names in Rails error messages

The defaults in Rails with ActiveRecord is beautiful when you are just getting started and are created everything for the first time. But once you get into it and your database schema becomes a little more solidified, the things that would have been easy to do by relying on the conventions of Rails require a little bit more work.

In my case, I had a form where there was a database column named “num_guests”, representing the number of guests. When the field fails to pass validation, the error messages is something like

Num guests is not a number

Not quite the text that we want. It would be better if it said

Number of guests is not a number

After doing a little bit of digging, I found the human_attribute_name method. You can override this method in your model class to provide alternative names for fields. To change our error message, I did the following

class Reservation < ActiveRecord::Base
  ...
  validates_presence_of :num_guests
  ...
  HUMAN_ATTRIBUTES = {
      :num_guests    => "Number of guests"
  }
  
  def self.human_attribute_name(attr)
      HUMAN_ATTRIBUTES[attr.to_sym] || super
  end
end

Since Rails 2.2, this method is used to support internationalization (i18n). Looking at it, it reminds me of Java’s Resource Bundles and Spring MVC’s error messages. Messages are defined based off a key and there’s a chain of look ups that get applied to resolve an error’s message.

Although, I don’t see myself doing any i18n work in the near-term, it is cool that we have that option now in Rails.
Custom field names in Rails error messages

Recognizing talent (at the metro)

After reading about the violinist playing in the metro (which happened awhile ago), I think we are, at many times, too preoccupied with ourselves and the things that are happening in our lives when we should be taking a moment or a step back to recognize the great things that are happening right in front of us.

Do you think you would be able to recognize extraordinary talent when it is staring you in the face?

Video for viewing pleasure:

Recognizing talent (at the metro)

Checkboxes in Stripes and Spring MVC

When building dynamic web sites with lots of javascript UI components being created on the client, understanding how the web framework you’re using will process the request and what must be done to update fields accordingly is even more important.

Specifically, checkboxes have always been a pain to deal with. The gotcha with checkboxes are if a checkbox isn’t checked, the request doesn’t send the parameter so it requires some additional checks to detect that the user deselected something that was there to update the field accordingly. I’ve been playing around with the Stripes framework and ran into this issue.

With Stripes, you can render a checkbox using their JSP tag:

<stripes:checkbox checked="true" name="property1" value="yes"/>
<stripes:checkbox checked="true" name="property2" value="no"/>

When the “checked” value is equal to “value” value, Stripes will render the checkbox as checked. So with the code shown, two checkboxes will be shown with the first checked and the second unchecked.

If a user reverses this by unchecking the first, checking the second, and submit the form, the HTTP request will only see that property2=no. Before the form was submitted, “property1” had a value of “yes”. Now, “property1” won’t even appear in the request parameters, so we have to do special handling to check for the absent of the parameter to update “property1” to whatever value it should be when it is not checked.

In Spring MVC with form binding, checkboxes are dealt with a little differently. Using Spring MVC’s form JSP tag, you can do:

  <form:checkbox path="property1" value="yes"/>
  <form:checkbox path="property2" value="no"/>

Assuming your command bean is named “person”, this will generate the following HTML:

        <input name="person.property1" type="checkbox" value="yes"/>
        <input type="hidden" value="1" name="_person.property1"/>
        <input name="person.property2" type="checkbox" value="no"/>
        <input type="hidden" value="1" name="_person.property2"/>

As noted by the docs,

What you might not expect to see is the additional hidden field after each checkbox. When a checkbox in an HTML page is not checked, its value will not be sent to the server as part of the HTTP request parameters once the form is submitted, so we need a workaround for this quirk in HTML in order for Spring form data binding to work. The checkbox tag follows the existing Spring convention of including a hidden parameter prefixed by an underscore (“_”) for each checkbox. By doing this, you are effectively telling Spring that “the checkbox was visible in the form and I want my object to which the form data will be bound to reflect the state of the checkbox no matter what”.

Spring MVC also provides a “checkboxes” tag which allows you to render a list of checkbox boxes without having to wrap the “checkbox” tag around a JSTL forEach.

Hopefully, that gives you some insight into how to work with checkboxes in Stripes and Spring MVC.

Checkboxes in Stripes and Spring MVC

IBM to buy Sun? Yay for developers!

There’s buzz going around that IBM is in talks to buy Sun. Brian Aker, Director of Technology for MySQL at Sun, gives some insights into what he thinks will happen if this deal goes through. Many have concerns that there’s a huge culture clash and IBM will just gobble up all the great things MySQL and Sun have produced.

All valid concerns. However, if IBM can maintain the developer community relationship that Sun and MySQL have built I think developers may have a lot to look forward to. Especially, government contractors.

First thing that popped into my mind when I read this was

Sweet! No more heavy-weight Oracle development. The government will allow devs to use MySQL now!

After all, it’s backed by Big Blue.

And nobody ever got fired for choosing IBM.

Right?

Installing Oracle on a laptop still gives me nightmares. *shudders*

IBM to buy Sun? Yay for developers!

Parallels Desktop vs VMWare Fusion

Ever since I got my Macbook, I’ve used Parallels with my Book Camp partition to run Windows side-by-side with OSX. I had heard that there was this other option of using VMWare Fusion but never really bothered to look into it. This was true until this weekend. It had been a couple of days since I recently upgraded to 4gb of ram. I actually had not started up Parallels in awhile but I wanted to test something in the dreaded Internet Explorer so I started up Parallels.

I was presented with the following message:

Windows could not start because the following file is missing or corrupt:
system32hal.dll.
Please re-install a copy of the above file.

Uh, what?

Must be a fluke! So, let’s try this again.

Windows could not start because the following file is missing or corrupt:
system32ntoskrnl.dll.
Please re-install a copy of the above file.

Uh-oh. This doesn’t look good.

After googling a bit, it turns out Parallels does some pretty bad things like modify essential Windows boot up files to get Boot Camp to work with Parallels. They even modify boot.ini! So, I think what happened to me was that Parallels crashed at some point and corrupted/deleted these essential Windows files rendering my Windows partition unbootable.

This is what you call a deal breaker. If your software’s purpose is to allow other operating systems to run, rendering said operating system unusable is a big no no.

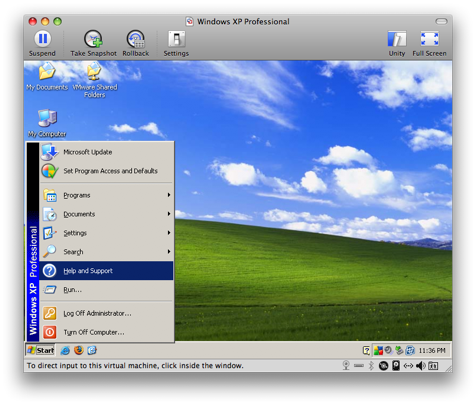
fusion-1
So, I’ve been using Fusion for a day or two now, feature for feature pretty much has everything Parallels had. Even the user interface is fairly similar, they just call things a little different. For example, what Parallels calls Coherence, Fusion calls Unity. Performance is about the same but I don’t really play games or anything other than startup Internet Explorer when running Windows. Best of all, Fusion doesn’t seem to do terrible things like modify Windows boot up files. Fusion beats Parallels hands down.

Parallels Desktop vs VMWare Fusion

Setup Apache on Mac OSX Leopard

I’ve had my Macbook for a little over a year now. However, I just recently found out Leopard comes with apache (apache2 to be specific) already installed. To verify this is true, open up Terminal and type

  
>> apachectl -V
Server version: Apache/2.2.9 (Unix)
Server built:   Sep 19 2008 10:58:54
Server's Module Magic Number: 20051115:15
Server loaded:  APR 1.2.7, APR-Util 1.2.7
Compiled using: APR 1.2.7, APR-Util 1.2.7
Architecture:   64-bit
Server MPM:     Prefork
  threaded:     no
    forked:     yes (variable process count)
Server compiled with....
 -D APACHE_MPM_DIR="server/mpm/prefork"
 -D APR_HAS_SENDFILE
 -D APR_HAS_MMAP
 -D APR_HAVE_IPV6 (IPv4-mapped addresses enabled)
 -D APR_USE_FLOCK_SERIALIZE
 -D APR_USE_PTHREAD_SERIALIZE
 -D SINGLE_LISTEN_UNSERIALIZED_ACCEPT
 -D APR_HAS_OTHER_CHILD
 -D AP_HAVE_RELIABLE_PIPED_LOGS
 -D DYNAMIC_MODULE_LIMIT=128
 -D HTTPD_ROOT="/usr"
 -D SUEXEC_BIN="/usr/bin/suexec"
 -D DEFAULT_PIDLOG="/private/var/run/httpd.pid"
 -D DEFAULT_SCOREBOARD="logs/apache_runtime_status"
 -D DEFAULT_LOCKFILE="/private/var/run/accept.lock"
 -D DEFAULT_ERRORLOG="logs/error_log"
 -D AP_TYPES_CONFIG_FILE="/private/etc/apache2/mime.types"
 -D SERVER_CONFIG_FILE="/private/etc/apache2/httpd.conf"

To start up apache, you can do it a couple of ways.

Type sudo apachectl -k start

or

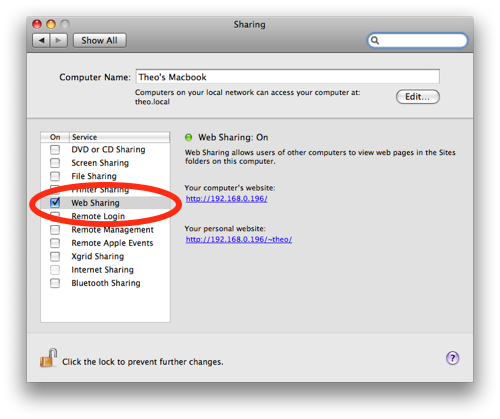
web-sharing

  1. Go to System Preferences
  2. Click on Sharing
  3. Check the box that says Web Sharing

You can go to http://localhost or the URL provided in the Web Sharing screen to confirm apache is running and is able to serve up requests.

There is also a ~/Sites directory in your home folder. Apache is already setup to serve up files from this directory under http://localhost/~[username] where [username] is your user account name. Any files here will be render for example ~/Sites/index.html is accessible from the browser via http://localhost/~[username]/index.html.

One note to get this to work. Out of the box, all requests to /Sites result in a Forbidden 403 error. To resolve this issue, modify the conf file specified above as SERVER_CONFIG_FILE (/private/etc/apache2/httpd.conf in my case) from

<Directory />
    Options FollowSymLinks
    AllowOverride None
    Order deny,allow
    Deny from all
</Directory>

to

<Directory />
    Options FollowSymLinks
    AllowOverride None
    Order deny,allow
    Allow from all
</Directory>

Restart apache (sudo apachectl -k restart) and try going to http://localhost/~[username] again.

Setup Apache on Mac OSX Leopard

Cleaning up iPhoto

The longer I use iPhoto, the more I hate it. When I initially started using it, I would import photos but choose not to copy the originals to the iPhoto Library. In the past year or so, I’ve started to just allow iPhoto to copy the originals to the iPhoto Library. So now, I ended up with photos scattered all over the place. This was a pain to maintain and figure out where my photos were.

I decided that I want all photos to be in one place and if I was going to use iPhoto, I’m going to import by copying the originals to the iPhoto Library. Before I could get all of this to happen, I had to backup all of existing photos that were not in the iPhoto Library to an external hard drive. Planning on importing these photos over again from the external hard drive, I then deleted all of these photos through Finder. Going back into iPhoto, I still saw the thumbnails for the photos I just deleted. If I attempt to open any of them though, it complained it couldn’t find the original. What a mess. There doesn’t seem to be a way to refresh your iPhoto Library and it would remove photos it doesn’t have references to any more.

I figure the easiest way to get my iPhoto Library setup the way I want it is to start from scratch. So I went under my Pictures directory and renamed iPhoto Library to iPhoto Library.original. Opening up iPhoto again, you get prompted to search for your Library or create a new one. I choose create a new iPhoto Library and now I can begin importing my photos.

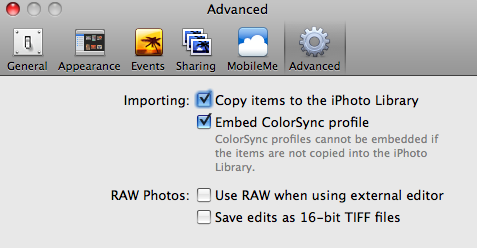
iphoto-prefs

After making sure I have the option to copy items to iPhoto Library when importing, I can now import photos from my external hard drive.

Great! Now I have all of my scattered photos in iPhoto Library. But what about the photos I had imported to the original iPhoto Library ( the ones under iPhoto Library.original)? Well, there didn’t seem to be an easy way to import non-broken originals form one iPhoto Library to another from the GUI so I went to the command line.

All of the original photos that are imported to an iPhoto Library are under a folder called Originals. However, due to the way iPhoto manages the photos, this also includes the broken files that reference the photos I had deleted. Basically I wanted to get rid of all of these broken references before importing all of the photos from my original iPhoto Library to the new one I am creating. Here’s how I did it.

  1. Open up Terminal
  2. Change directory to the original iPhoto Library’s Originals directory (~/Pictures/iPhoto Library.original/Originals)
  3. The broken references aren’t actually symbolic links. They seem to be using extended file attributes to denote where the original file actually is (see xattr).  Since we deleted the actual photos, to identify these files type:
    find . -size 0
    

    to get a list of all of the 0 byte files.

  4. To remove them:
    find . -name "*.jpg" -size 0 -exec rm {}  ;
    

    or if you want to just move them elsewhere:

    find . -name "*.jpg" -size 0 -exec mv {} $dest ;
    

    where $dest is the path to where you want to move the files

  5. To delete all of the empty directories (that represent your events) for clean up purposes:
    find . -depth -type d -empty -exec rmdir {} ;

Now your original iPhoto Library should only contain photos that were imported by copying the originals to the iPhoto Library.

To finish importing everything, open iPhoto, choosing your new iPhoto Library and import the Originals directory from the original iPhoto Library (~/Pictures/iPhoto Library.originals/Originals). You might have to copy this folder someplace else since the Import menu doesn’t allow you to specify going into the iPhoto Library.originals package.

After about 5 hours of battling with iPhoto, I think I finally have all of my photos reimported to a fresh iPhoto Library with no duplicates and broken file references. Having to do all of this really makes me think to just switch to something else. How do you guys feel about iPhoto? What are some good alternatives? Picasa anyone?

Cleaning up iPhoto

Moving wordpress to another host

If you’ve been following my blog for awhile, you might have noticed I moved this blog from www.theodorenguyen-cao.com to theodorenguyen-cao.com as it was more fitting domain. I originally just registered the domain, added the DNS record, and updated my apache config to have theodorenguyen-cao.com to be an server alias to www.theodorenguyen-cao.com.

This allowed requests to www.theodorenguyen-cao.com/* and theodorenguyen-cao/* respond with the same content. I thought I was done. I discovered this wasn’t the case when I saw www.theodorenguyen-cao.com as a direct traffic source in my google analytics for theodorenguyen-cao.com. To fix the screwed up analytics, I needed to make it so that all requests that go to www.theodorenguyen-cao.com are permanently redirected (301) to theodorenguyen-cao.com.

To do this I had to apply an Apache mod_alias redirect directive as such:

<VirtualHost *:80>
        VirtualDocumentRoot /var/www/blog
        ServerName www.theodorenguyen-cao.com
        Redirect permanent / https://www.theodorenguyen-cao.com/
        ErrorLog /var/log/apache2/wp-error.log
        TransferLog /var/log/apache2/wp-access.log
</VirtualHost>

The virtual host for theodorenguyen-cao.com looks like:

<VirtualHost *:80>
    VirtualDocumentRoot /var/www/blog
    ServerName www.theodorenguyen-cao.com
    ServerAlias theodorenguyen-cao.com
    CustomLog /var/log/apache2/theodorenguyen-cao.com_access.log Combined
    ErrorLog /var/log/apache2/theodorenguyen-cao_error.log
</VirtualHost>

At first I thought this would only fix the simple case of www.theodorenguyen-cao.com redirecting to theodorenguyen-cao.com, but blog.notepath.com/foobar not being translated to theodorenguyen-cao.com/foobar. However, this does exactly what I want. All www.theodorenguyen-cao.com URLs will be replaced with theodorenguyen-cao.com URLs. Old bookmarks will simply redirect to a theodorenguyen-cao.com URL and not 404.

Success!

I’m still waiting to see if Google will update the search result links that point to www.theodorenguyen-cao.com to be theodorenguyen-cao.com URLs.

Moving wordpress to another host

Using validates_presence_of on a boolean field? Should use validates_inclusion_of!

rsvp.theoandpat.com had boolean flag to marked whether or not a visitor was going to be able to make it to our wedding. Unfortunately, if you selected you were not able to make it and submit the form, the application would return saying it could not process your submission because you have to say that you are going to make it. I argued, this is an RSVP form so you have to accept if you are RSVPing. That’s the point of the RSVP! Only people RSVP would bother submitting the form!  Pat wasn’t too happy about that and ask/told me to fix it. 

Digging into it, it turns out the way  for validates_presence_of relies on Object#blank which of course when sent

false.blank? # returns true

Reading up on the documentation, it is suggested to use validates_inclusion_of when dealing with booleans.

The one line change solved the problem:

validates_inclusion_of :accepted, :in => [true, false]
Using validates_presence_of on a boolean field? Should use validates_inclusion_of!